Showing posts with label X: Audio Engineering. Show all posts

Thursday, February 05, 2009

Live Cleint: Testing Equipment

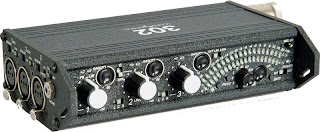
I had a two hour session today to use and test the equipment that I intend to use on Friday's shoot. I am mainly concerned about capturing everything that the protagonist says as this is how the story of my documentary will be revealed. However I also need to capture the ambient sound and have control over the levels of each in the edit.


http://www.windovertheearth.com/VSoundDevices.html

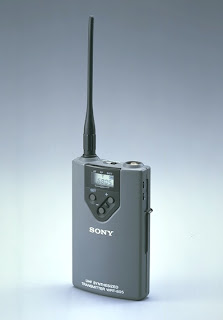
As a result of conversations with academic staff and technicians I have decided to use a portable mixer and connect a radio mic and a K6 mic into two separate mic channels. I will pan each mic hard left and hard right and change the settings on the HD camera so that each mic records onto separate channels. Although this method will result in two mono tracks I will effectively have more control on the levels of the dialogue and the ambience.


http://www.toptech-tls.co.uk/Radio%20mics.htm

At first i found it extremely difficult and challenging to get my head around the equipment. All the cables and buttons. But I am really glad I had a test today rather than on the day of the shoot. Once I attempted to push the buttons and discover what each function does, I learned that it is quite logical and not as complicated as it looks. I have made noted but I hope that I can put all this into practise for the shoot. I will have far more assistance than I have ever had on a shoot and therefore I will have more support. Fingers crossed....technically!

Wednesday, January 10, 2007

Week 17: Seminar - Mixing Session

We used this seminar session to mix the band recording from last week. Below is a step-to-step breakdown of how we approached the mix including the final bounce down:

1. Solo Kick Drum [solo mode – switch off latch – >Preferences
2. Insert Shelving EQ on kick drum – apply high shelf EQ to get rid of cymbals and snare
3. Send to Noise Gate
4. {On Desk} Press ‘Switch Active’ – cycle through to find ‘Gate’ – Press ‘Switch Active’ again.
5. Set Threshold, Attack, Release and Ratio
6. Apply 4-Band EQ to boost kick drum and achieve a ‘thud’ sound. If clipping after gain is lowered, input can also be decreased.
7. Drag Snare track next to Kick track
8. Apply EQ on snare to get rid of ringing sound [ low Q = narrow bell, high Q = selective]
9. Apply compression to snare
10. Pan Hi-hat slightly to right (left handed drummer)
11. Drag two overheads next to Hi-Hat
12. Pan over-heads hard right and hard left.
13. Toms: use Beat Detector to define toms and remove unwanted noise
14. Create stereo aux track – label ‘drum mix’ – Send to BUS 1 & 2 Stereo. Set the input of the aux track to BUS 1 & 2.
15. Select all drum tracks > Track > Group (label) > OK
16. Apply Compression to bass guitar (so that overall gain can be increased.
17. Apply EQ to bass guitar to increase lower frequencies
18. Apply EQ to Electric guitar
19. Apply compression and lower shelf EQ to vocals
20. Create stereo master fader {A1 & A2}
21. Insert > Plug-in > Max It [to increase overall volume level of song – must be the final stage of mixing process]
22. Mix Down: Highlight song area in timeline > File > Bounce to Disc [Source = A1 + A2, File type = Wave, Format = Stereo, 16 bit, 44.1 Hz > Bounce > Choose Location.

Week 17: Lecture - Intro to MIDI

MIDI stands for Musical Instrument Digital Interface. The key concept of MIDI is that it transmits data and not actual audio signals. It is a serial communication system and transmits information sequentially. For example a keyboard can be connected to a sound module. The various keys on the keyboard trigger a particular sound on the sound module. MIDI has 16 channels (independent lines of communication); therefore 16 different sounds can be played simultaneously. Below is the procedure for creating a MIDI track in the studio using a Roland Sound Module:


1. Create MIDI track (takes in MIDI data instead of audio signal)
2. Record enable the track
3. Create a new stereo aux track
4. Load insert sends on audio tracks
5. Set fader to ‘0’
6. Insert > Multi-channel Plug-in > Instrument > Sample Tank [16 different sounds = choose one]
7. {MIDI track} Output > Sample Tank > Channel One
8. Create mono audio track (for click)
9. {Mono Track} Send > Plug-in > Instrument > Click > Cowbell
10. Event > MIDI > Quantize à Groove (=humanised)
11. Record > Play [play keyboard to trigger selected sound]

Note: The first 6 step can also be done in following way:

1. New Track > Instrument Track (audio and MIDI track in one channel strip)
2. Send > Plug-in > Instruments > Drum Kit
3. Record > Play

Week 16: Seminar - Band Recording Session

In this seminar we had a real band come into the studio. I was playing the role of the Producer. This involved liaising with the artists and making sure everything runs smoothly. We recorded the acoustic drums, electric guitar, bass and vocals. Once again we used the same set ups as before; the bass guitar was miced up just like the electric guitar. The bass guitar amplifier did not have a line output therefore we could not connect it directly with the D.I. box. We started the session by setting up the microphones, and then we did a sound check.

Neumann TLM 103

http://www.coutant.org/11.html 2006

After having recorded the instruments we recorded the vocals using a Neumann TLM 103 condenser microphone. The TLM 103 is ideal for recording vocals as it is a pressure gradient microphone and has a large diaphragm, where both sides are exposed to the sound. Therefore the microphone responds to the difference in pressure on both sides of the membrane. Being a condenser microphone, it also picked up the room acoustics too.

Week 16: Lecture - Effects Processors

A device that “effects” the audio signal passing through it is called and effects processor. They are also known as plug-ins in software based processors. Unlike with the dynamic processor only a part of the signal is sent to the effects processor instead of the entire signal. A clean single is more commonly known as the ‘dry’ signal and the effected signal is the ‘wet’ signal. An ‘auxiliary send’ is used to send some of the incoming signal to an external output, which then sends it to an effects processor. The ‘auxiliary sendlevel determines how much of the incoming level is sent. The effected signal is sent through the effect processor output back into the mixing console either to another channel or to an input called the ‘auxiliary return’. The signal sent to the effects processor is always mono, and the returning signal is always stereo.

Within the software environment it is more efficient to load up a plug-in on an auxiliary track with the effect (e.g. reverb) rather than loading up a plug-in for each track. You can then set up a send for each track that needs reverb and individually control the level of the send.

Equalisation (EQ) involves cutting or boosting particular frequencies within the signal.

HF & LF Shelving Filters

High Frequency (HF) and Low Frequency (LF) shelving filters have a fixed frequency that work on and are exactly the same as Bass and Treble on a standard Hi-Fi.


Parametric EQ

Parametric EQ is a more selective process of equalisation as you can cut or boost a certain frequency region rather than cutting or boosting all the bass/treble frequencies. The three main controls in parametric EQs are Centre Frequency, “Q” and Cut & Boost. “Q” determines how selective the EQ is and can be calculate by the following formula: Q = Centre Frequency / Bandwidth.

The -3dB Point

The cut-off point of a filter is measured by the frequency at which its level has decreased by 3dB. The -3dB point is known as the half-power point.

Thursday, January 04, 2007

Week 15: Seminar - Drum Editing Exercise

In this seminar I worked through Bob Kulick’s book Multi-Platinum Pro Tools. The aim was to try the drum pocketing exercises. This mainly involved editing the drum kit so that it is on time and getting rid of clicks or noise that is not needed.

I did not get very far as it was my first session on Pro Tools on my own. However it was a useful seminar as I became more confident in using the software.

[ADAM. N, BARNETT. B, Multi-platinum Pro Tools: Advanced Editing, Pocketing and Auto tuning Techniques. Focal Press; Book&Dvdrm edition. Aug 2006.]

Week 15: Lecture - The Noise Gate

The Gate is similar to the Limiter and the Compressor, it is an extreme version of the Expander. Therefore it cuts out all parts of the signal that are below the threshold level.

Week 15: Lecture - The Limiter

The Limiter is an extreme version of the Compressor as it has ratios of 20:1 or higher. It acts like a ‘brick wall’ and keeps the output at approximately the same level no matter how much the incoming signal exceeds the threshold.

Week 15: Lecture - The Compressor & Expander

The compressor is used to reduce the dynamic range of an audio signal so that the overall average level can be increased. The Compressor therefore monitors any incoming signal, and once it exceeds the threshold it is automatically reduced by the amount set on the ratio control. It is similar to physically increasing and decreasing the fader in real-time as the singer is being recorded (‘riding the fader’).
The Expander

This processor does the opposite of what the Compressor does. It increases the dynamic range by reducing the output level so that it is under the threshold. Therefore the range between the loudest and quietest parts is increased.

Week 15: Lecture - Dynamic Processors

An audio signal can be altered using a device called a dynamics processor. There are four common processors: The Compressor, The Limiter, The Expander and The Noise Gate. Each processor has the following main controls.

Attack: sets the time it takes for the device to kick in.

Release: sets the time it takes for the device to return to unity gain so the signal is no longer being processed.
Threshold: sets the level at which the signal will be processed. As soon as the signal exceeds the threshold the processor kicks in.
Ratio: sets the amount by which the signal will get reduced once it surpasses the threshold.
Input: How much of the signal is sent to the processor. (Usually set to 100%)
Output: How much of the processed signal is sent back out. (Usually set to 100%)
Hard Knee

As soon as the incoming signal goes beyond the threshold it is instantaneously controlled by the ratio.

Soft Knee
The incoming signal begins to get controlled a few dB’s before the set threshold value and slowly more and more of the signal is controlled until it reaches the set threshold.

Week 14: Seminar - Recording & Basic Mixing Session

In this seminar session we recorded the acoustic drums, grand piano and an electric guitar. The images below show the set up.


http://thecoloringspot.com/music/music-coloring-pages-1.html 2006

As you can see this time instead of two Rode NT-3 mics we used the Rode NT-4 Stereo condenser. This does exactly the same job and picks up a stereo sound of the piano and the room acoustics. The only difference is that it is one microphone, which is why it is useful. In addition to this it has two outputs different that connect to the wall box, which means you can have a right and left channel for the piano when mixing.


http://thecoloringspot.com/music/music-coloring-pages-1.html 2006


This is a typical drum kit mic set-up. The two condenser mics at the top are also known as overheads, they pick up the cymbals and an overall sound of the drum kit, which once again gives a stereo sound as there is a left and right mic. The dynamic mics are used for close micing the snare drum, the two toms. We placed one dynamic on top of the snare and one underneath it so we have more flexibility and choice in sound when mixing. The AKG 112 is a dynamic microphone which is specially designed to pick up lower frequencies and is ideal for the kick drum.


http://www.dibujosparapintar.com/hoja13.html 2006

We miced up the electric guitar and connected it directly to the wall box via a D.I. box (as shown in the image below). The two different options would give us flexibility when mixing.

After recording some audio we covered basic mixing techniques on ProTools. Inserts and Sends are set up in the Mixing window at the top of the channel strip. The dark grey area in the middle is used for setting up plug-in inserts and the lighter grey area below it is used for setting up sends.

Week 14: Lecture - Signals & the dBs

The dB is a logarithmic unit of measurement. There are two ways of expressing the signal levels:

dBu: Professional level – referenced to 0.775Vrms

dBV: Consumer level – referenced to 1Vrms

The ‘u’ and ‘V’ are known as the reference level and are used with dB to give a voltage value. The value in front of the dBu/V tells us how much higher or lower the voltage is to the reference.

e.g. -7dBV = 7 decibles lower than 1V
+10dBu = 10 decibles higher than 0.755 Vrms

To calculate the voltage level you would use this formula:
dB = 20log(A/B) [A=output B=input]

dB can be used to express a voltage level with the addition of a reference unit and also the gain of a system without the addition of the reference level.

The dBSPL

Sometimes written as ‘dB’, the dBSPL is used to express sound pressure levels and is related to the range of pressures which the human ear can deal with. Only positive values are used because 0dBSPL is the smallest amount of sound pressure which the human ear can detect. 140dBSPL is the threshold of pain.

The dBFS

The dBFS is used for metering in digital systems. The ‘FS’ stands for ‘full scale’. dBFS does not have fixed reference values like dBu and dBV. When the 0dBFS level is surpassed clipping occurs, therefore only negative values of dBFS can be used.

Week 14: Lecture - The Saw Tooth Wave

The Saw Tooth Wave: Contains both odd and even harmonics. The amplitude is determined by 1/n x the fundamental amplitude.


Time Domain Plot

Week 14: Lecture - The Triangle Wave

Is similar to the square wave as it also contains all the ‘odd’ harmonics however it’s amplitude is determined by 1/n². (e.g. The amplitude of a harmonic number of 4 would be 1/16th of the fundamental.)

Time Domain Plot

Week 14: Lecture - The Square Wave

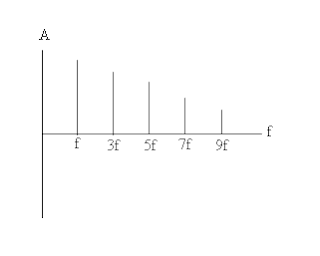
The square wave has a ‘harsher’ sound due to its harmonic content. It is useful and commonly used in audio testing. It contains all of the ‘odd’ harmonics (3,5,7,9) and therefore is not as smooth as the sine wave. It’s amplitude is determined by 1/n x the fundamental amplitude.

Time Domain Plot
Frequency Domain Plot

Week 14: Lecture - The Sine Wave


Time Domain Plot: A graphical representation of how a wave form changes its amplitude in relation to time. This is also known as an envelope. The amplitude is determined by change in pressure.


Frequency Domain Plot: A graphical representation of the instantaneous frequency components against their respective amplitudes.

Week 14: Lecture - Review of Acoustics

There are three main aspects of wave theory:

Wavelength (λ): The length in metres from the start to the end of one cycle of the wave form.
Formula: λ=V/ ƒ

Frequency (ƒ): The total number of cycles per second. The higher the frequency the higher the pitch.
Formula: ƒ=V/ λ

Velocity (V): The speed at which sound travels in air. (Known constant = 330msֿ¹ @ 0°C or 340msֿ¹ @ 20°C).
Formula: V= ƒλ

Most common waveform is the Sign wave, also known as a ‘pure tone’ because it has no harmonics or partials, it only has fundamentals.

Fundamental: The frequency that we hear the sound at.

Harmonic: An integer (numeral) part of the fundamental – whole number multiples of the fundamental.

Partial: Non-integer (non-numeral) multiple of the fundamental, more commonly found in real instruments.

Week 13: Seminar - Recording Session

In this session we recorded a saxophone and the grand piano. We began by discussing the different microphone types and placements. We decided to place two Rhode NT-3 microphones on the piano to achieve a stereo sound. Being condenser microphones, they picked up the piano sound clearly even though they were placed quite high up (right and left). In addition to this condenser mics pick up the room acoustics. Similarly we used a Rhode NT-2 to achieve an overall sound of the saxophone. And two Shure SM58’s to close mic the saxophone. The images below show the setup. We also covered basic headphone monitoring and talkback from the studio to the live room.


http://www.edupics.com/coloring-pictures-pages-book-saxophone-2079.htm 2006


Week 13: Lecture - Basic Intro to ProTools

ProTools is an audio recording and editing software. There are two main windows:

The Mix Window: Is like a mirror of the desk, the tracks are displayed as channel strips and have the same functions as the buttons and knobs on the desk. For example panning, volumes, record enable, solo/mute, and controls for inserts, sends, inputs and outputs.

The Edit Window: Displays a timeline of recorded audio, MIDI data and mixer automations. All the editing takes place in this window and therefore all the tools and main functions are found here.

Audio can be imported into ProTools digitally, and then edited in the mix window. [File > Import Audio – choose audio and then click convert file.]
Edit Modes: They are located at the tope left corner in the edit window.
- Shuffle = snaps two regions automatically
- Slip = free hand moving tool
- Spot = used for time code
- Grid = lets you snap to a pre-defined grid (useful for drum editing)
Edit Tools:
- Zoomer = used to zoom in or out continuously. (Horizontally: press start and drag right or left. Vertically: press start+shift and drag up or down).
- Zoom toggle = lets you define and toggle between different zoom states.
- Trim = used to shorten or expand regions, notes and data.
- Selector = used to place the cursor in a certain track or make edit selections on tracks.
- Grabber = used to select, move, separate and arrange regions on tracks.
- Scrubber = used to ‘scrub’ back and forth and listen to the audio at a slower speed to find a particular location.
- Pencil = allows you to draw automation, MIDI data, tempo/volume changes and audio waveforms.
- Smart Tool = allows you to access the selector, grabber and trim tools at the same time depending on the position of the cursor.

Week 12: Seminar - Introduction to Studio

In the seminar we had a recap on how the studio works, what we need to do before starting a session, how to load up ProTools etc. We also had an introduction to the equipment available in the studio.